
Fundamentals
THINGS YOU SHOULD KNOW BEFORE YOU START
TRIMMING
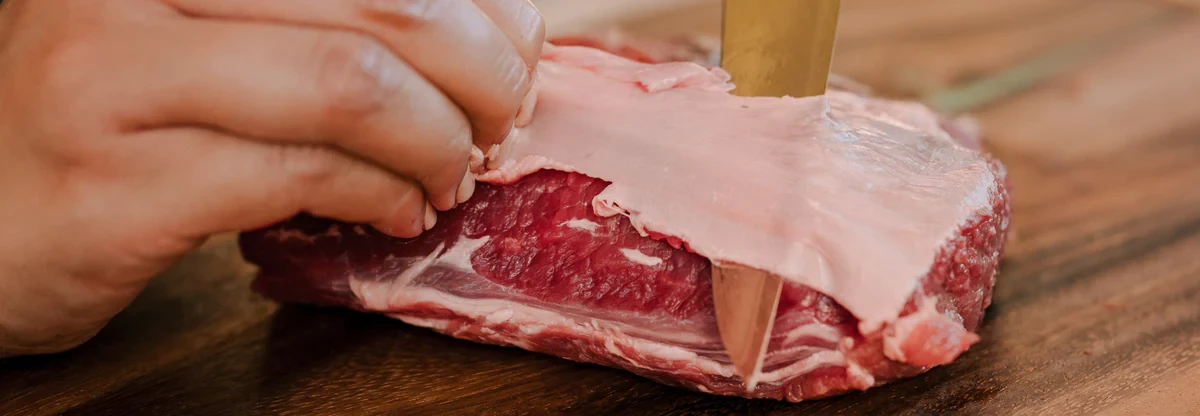
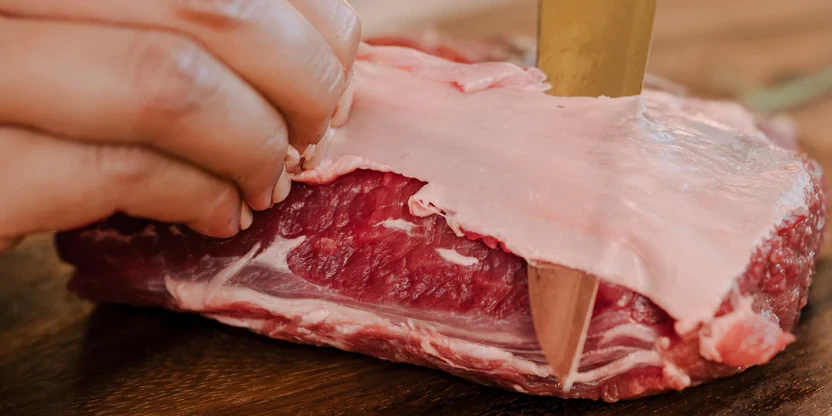
What is Silver Skin?
Silver skin is a thin, protective layer of connective tissue that covers the muscles of some cuts of meat. It can be left on any meat that is going to be slow-cooked/braised because the silver skin will eventually break down. On other cuts, such as; Strip Loin, Sirloin, Loin Chops, Shoulder Blade Chops, Butterflied Leg, Tenderloin and Heart, silver skin can become tough and chewy when cooked ruining the overall texture. It can also prevent the penetration of seasonings likes rubs and marinades. That’s why so many cooks choose to remove it before cooking and so do we.
Removing silver-skin in 4 easy steps:
- Start by removing any surrounding fat, which should be easy to pull off by hand.
- Locate the area of silver skin you want to remove.
- With a sharp knife, start by making a small cut in the skin.
- Hold on to the end of the skin with your fingers and carefully run the tip of your knife under the silver skin, as you pull it away from the meat- be careful not to cut into the meat itself.
Notes: It's perfectly fine to leave a little bit of fat behind, but remember that silver skin doesn't melt away like fat does when it cooks. Make sure you remove all traces of it. With a little practice, you should be able to remove silver skin quickly and easily.
Resting
Allow the meat to rest after cooking. This allows the juices to redistribute, as the meat finishes cooking, reaching its ideal doneness temperature. Smaller cuts will need at least 5-7 minutes and larger cuts will need at least 15 minutes of rest time.
CUTTING
Cutting across the grain results in a much tender, easier-to-chew piece of meat. Cut perpendicular to the fibers that run across the piece of meat. Also, instead of cutting straight down, slice the meat at an angle with your knife tilted at a 45° angle to your cutting board.
STORING
Once the meat has thawed in the refrigerator use it within 3 days.
RE-HEATING
When it comes to reheating venison, there is no hard and fast rule. The best way to reheat your venison will depend on the cut of meat and your personal preferences.
Some helpful tips:
- Be sure to use low to moderate heat when reheating, as too much heat can cause the meat to toughen and be dry. For example, if you are reheating a tender cut like a tenderloin, sear it in a pan over medium heat and add a little bit of fat or oil.
If you are reheating a stew, heat it slowly on the stovetop over medium-low heat until warmed through. - The downside to blasting it in the microwave, is it can dry out the meat. If using, err on the side of caution and cook the meat for a shorter amount of time at a lower heat setting.